Write your own email server (in Rust!)
A walkthrough on how to implement and deploy your own disposable email server from scratch using Turso and Rust.

#Write your own email server (in Rust!)
As a loyal user of 10minutemail, I always wondered how hard it would be to implement and set up your own disposable email server — one used solely for posting your email address to one of those “we'd love to know more about you before we let you download our open-source software” forms, registering to trial periods, and local tests for my other weekend projects. As it turns out, implementing such a server is a surprisingly smooth and gratifying experience!
The result of this small personal hackathon is edgemail, an open-source disposable email server. In this post, you'll see how to write and deploy one yourself. A public instance of edgemail is hosted here.
#About SMTP
Simple Mail Transfer Protocol (SMTP) is old. I was also surprised to discover that for such a battle-tested and reliable protocol, there aren't that many resources to learn about its details, especially if you would like to implement it yourself. In fact, all “build your own SMTP” tutorials basically start with “install Postfix” — which is a fully-fledged, production-grade SMTP server! Let's start with the basics instead.
SMTP is an application layer protocol that runs on top of a transport layer, which is customarily TCP. SMTP is text-based and connection-oriented, which fortunately makes it human-readable. An SMTP transaction is simply a sequence of request-reply messages.
An example conversation between a client and a server may look like this:
Server->Client: 220 edgemail server reporting for duty 🫡
Client->Server: HELO smtp.example.com
Server->Client: 250-smtp.example.com Hello user
Client->Server: MAIL FROM:<robert@example.com>
Server->Client: 250 Ok
Client->Server: RCPT TO:<rosie@example.com>
Server->Client: 250 Ok
Client->Server: DATA
Server->Client: 354 End data with <CR><LF>.<CR><LF>
Client->Server: From: "Robert <robert@example.com>
Client->Server: To: "Rosie <rosie@example.com>
Client->Server: Date: Wed, 19 Apr 2023, 12:30:34
Client->Server: Subject: Hi Rosie!
Client->Server: Hi Rosie! How are you today?
Client->Server: <CR><LF>.<CR><LF>
Server->Client: 250 Ok
Client->Server: QUIT
Server->Client: 221 Bye
This simple example is enough to start sketching an implementation of the server, which would be a quite simple state machine capable of handling a few commands: greeting the user, and receiving mail. Sending mail is more complex, and won't be covered in this blog post. Fortunately, we do not need to ever send mail from our disposable server — it's only going to be used as a throwaway address used for registering to unwanted newsletters.
#Implementation
The project's name is edgemail, which is a tribute to the fact that it provides low latency for its users thanks to using an edge-native database. More on that in a few paragraphs!
The server will be implemented as 3 separate layers:
- SMTP state machine, responsible for handling SMTP communication
- Database for storing mail
- Client for browsing mail
#SMTP state machine
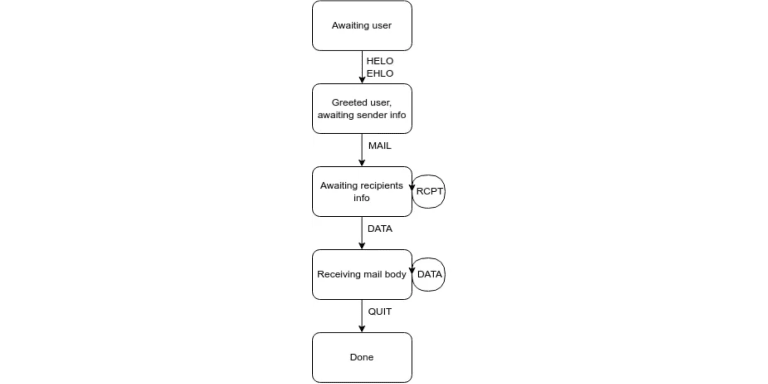
SMTP is a rather complicated standard, but fortunately for disposable email purposes we can ignore all the extensions, authentication, authorization, etc, focusing on just being able to receive mail. The (slightly simplified) figure below shows how our server is going to operate.

Once a connection is established, the server introduces itself, and then performs a handshake by accepting a HELO or EHLO (extended-hello) message. After the handshake is done, the server waits for the MAILcommand, which contains information about who sent the email, followed by RCPT commands, with information about all recipients. Once the sender and recipients are known, the server accepts a DATA command which allows it to receive the email body. Once done, a goodbye procedure is performed, and the transaction is done.
Source code for the state machine is here.
#TCP Server
Once we have an SMTP state machine, it's time to hook it up with a TCP server. The server's job is going to be extremely simple:
- Accept a new connection
- Send an SMTP greeting
- Receive an SMTP command
- Process the command with our SMTP state machine
- Return the response back to the user
- If mail was received, save it in the database
With the Tokio crate, implementing such a TCP server is going to be a breeze.
Since our server is dedicated for use as a temporary mailbox for one person, we're not going to bother ourselves with user management. Instead, the server is going to accept all mail and save them in the database. In order to not go out of storage, old mail will be cleaned up periodically.
Source code of the server is here.
#Database
For storing all the mail, we're going to use Turso — an edge-native SQL database. Turso can receive requests over HTTP, which allows executing requests straight from the browser, and that makes responses ridiculously fast, as you'll see in the Performance section later.
Additionally, Rust client for Turso, libsql-client, is also capable of storing everything in a libSQL database — which is kept in a local file, just like SQLite. And that's just perfect for tests and quick prototyping.
In order to create a new database, start with installing our turso command-line tool.
Once you're done, create a new database — let's call it edgemaildb — with:
$ turso db create edgemaildb
The schema for storing mail is going to be straightforward, with all mail kept in a single table. This table will be auto-created on edgemail server startup if it does not exist:
CREATE TABLE IF NOT EXISTS mail (date text, sender text, recipients text, data text)
In order to speed up queries on the mail table, the following indexes can be created. They will also be auto-created on edgemail startup if not present:
CREATE INDEX IF NOT EXISTS mail_date ON mail (date)
CREATE INDEX IF NOT EXISTS mail_recipients ON mail (recipients)
#Connecting to the database from Rust
Turso is compatible with the libSQL Rust driver. The driver only needs two pieces of information to be able to operate:
- The database URL.
- An authentication token, which is required only when connecting to a Turso remote instance.
These can be specified as environment variables. The following configuration will connect to a Turso instance:
LIBSQL_CLIENT_URL=https://your-db-name-and-username.turso.io
LIBSQL_CLIENT_TOKEN=your-auth-token
… but you can also specify a local file to use for development purposes — no need to sign up to anything!
LIBSQL_CLIENT_URL=file:///tmp/edgemail-test.db
In edgemail, the situation is even simpler. If no URL is specified, the server will automatically start with a local database stored in an edgemail.db file placed in your system's temporary directory path:
pub async fn new() -> Result<Self> {
    if std::env::var("LIBSQL_CLIENT_URL").is_err() {
        let mut db_path = std::env::temp_dir();
        db_path.push("edgemail.db");
        let db_path = db_path.display();
        tracing::warn!("LIBSQL_CLIENT_URL not set, using a default local database: {db_path}");
        std::env::set_var("LIBSQL_CLIENT_URL", format!("file://{db_path}"));
    }
    let db = libsql_client::new_client().await?;
    db.batch([
        "CREATE TABLE IF NOT EXISTS mail (date text, sender text, recipients text, data text)",
        "CREATE INDEX IF NOT EXISTS mail_date ON mail(date)",
        "CREATE INDEX IF NOT EXISTS mail_recipients ON mail(recipients)",
    ])
    .await?;
    Ok(Self { db })
}
Once you go to production and store the emails at the edge, it's enough to point the LIBSQL_CLIENT_URL variable to your Turso database URL, and LIBSQL_CLIENT_TOKEN to the authentication token.
You can inspect your database's URL by running the following command:
turso db show --url edgemaildb
In order to generate an auth token, run the following command:
turso db tokens create edgemaildb
#Client
Since Turso speaks HTTP, our client is going to be a static webpage, which can be hosted for free in a multitude of places, like GitHub Pages. If you're worried about your database access tokens leaking after being published inside a webpage — don't. With Turso, you can generate read-only tokens for your database:
turso db tokens create edgemaildb --read-only
Those grant read-only access to your database. In this specific use case it's fine to “leak” the tokens to users' browsers, because the whole database is, by design, readable by everyone. Sending database requests straight from the browser is also great for your latency — your browser is going to fetch the data directly from the database, no middlemen involved. The _Performance_section at the end of this blog post shows the difference with concrete numbers.
The client is going to be divided into two pages: landing page for choosing your username and the inbox.
The landing page is a simple form which lets users pick any username they would like to use. The SMTP server accepts all incoming mail anyway, so any username can be chosen. For the undecided, a simple pseudo-random username generator will suggest a hint.
Once a username is picked, users are transferred to the inbox page, where all the magic happens.
The inbox page fetches all mail addressed to a given user directly from the database, essentially by sending the following SQL request:
const req = new XMLHttpRequest();
const url = 'https://edgemaildb-psarna.turso.io';
req.open('POST', url);
const readonly_token =
  'eyJhbGciOiJFZERTQSIsInR5cCI6IkpXVCJ9.eyJhIjoicm8iLCJpYXQiOjE2ODE4MjkxNDMsImlkIjoiNzIyY2IyYTEtY2M3MC0xMWVkLWFkM2MtOGVhNWEwNjcyYmM2In0.T55UgAMs9vP2zMI_AhOiD2AONj_bsnDNRjZiBBWUb2gKU5MEjJoW8uHbtMGqpJ0312SULpsWTWdEJ886oSjGCQ';
req.setRequestHeader('Authorization', 'Bearer ' + readonly_token);

const msg = JSON.stringify({
  statements: [
    {
      q: 'SELECT date, sender, recipients, data FROM mail WHERE recipients = ? ORDER BY ROWID DESC LIMIT ? OFFSET ?',
      params: ['<' + user + '@idont.date>', PAGE_SIZE, offset],
    },
  ],
});

req.send(msg);
This request is a SELECT operation, so it only requires read-only access to the database. That allows us to use a read-only authentication token that can be safely “leaked” to the webpage HTML source.
#Source code
The whole source code, including the server, client, and tests, is open-source and available here. Enjoy! In order to run the server, just go with cargo run. Tests can be run with cargo test.
#Deployment
#SMTP Server
Now that the server is implemented, it's time to make it public. For that, you're going to need any machine with a public, exposed IPv4 address and port 25 open for inbound traffic. Technically, SMTP runs just fine on IPv6 as well, but in practice, email providers often refuse to work with IPv6 servers as spam prevention. The IPv6 address space is simply too broad and too unregulated to be as easy to verify as good ol' IPv4, so it's better to stick with that. SMTP servers often listen to connections on other port numbers, including 465, and even 2525, but since 25 is universally supported among all email providers, it's enough to stick with that.
The edgemail server weighs less than 5MiB total and runs just fine on my ancient Raspberry Pi 2 — as long as it's accessible via a public IPv4 address at port 25, you're good to go.
#DNS configuration
In order to become a mailbox provider, you need a domain. Fortunately, with so many top-level domains available, you can get one at a really affordable price — I registered the idont.date domain a few years back with Porkbun for less than $2 a year.
Once you become a proud owner of an Internet domain, two DNS entries need to be set up to make your server functional. Examples below show my setup for the idont.date domain and the IP address of the machine I use, so make sure you replace them with your own domain name and IP address accordingly.
- An
Aentry, which points to the IP address of your server, e.g.[ A ][ smtp.idont.date ][ 3.143.135.0 ] - An
MX(mail exchange) entry, which points back to theAentry above, e.g.[ MX ][ idont.date ][ smtp.idont.date ]
With those two in place, servers which are going to send mail to you will be able to find out where to route the information. The email server will simply resolve the DNS entries and find out to which IP address it should send all the information.
That's it! With a server and DNS set up, the server is ready to receive mail. You can try it out by sending an email to your new domain, or signing up for that newsletter you always hated so much.
#Performance
The best part of using Turso as our database is the user-observed latency. Turso runs on the edge, which more or less means “close to you”.
With Turso, you can create a database at one of the multiple locations, spanning almost all continents (I would like to personally apologise to all residents of Antarctica, but I'm sure you have bigger things to worry about with your climate). Once the database is up, you can create a number of replicas in order to move data closer to your end users. Let's see how perceived latency changes once a replica is spawned closer to you.
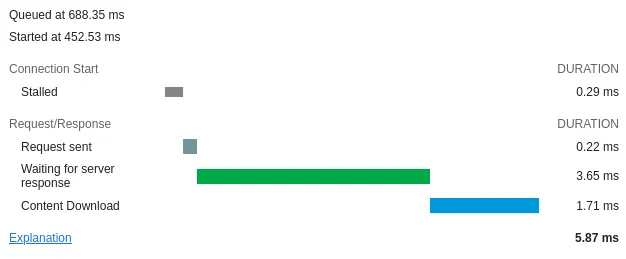
I'm currently a resident of the Warsaw metropolitan area in Poland. Right after creating a database in the Newark, NJ region (turso db create — location ewr mail_db), the loading time for my edgy_badger_2023@idont.date mailbox is far from great. Here's a screenshot of the developer console in my browser, tracking the timeline of executing an SQL command via HTTP:

Not bad, but also not great — you can actually see a short lag before the inbox is rendered.
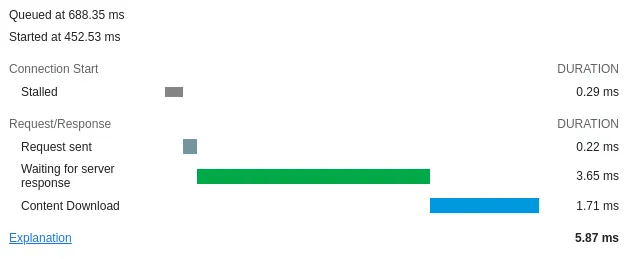
And here's how the timeline looks like once I replicate the database to Equinix's Warsaw datacenter (turso db replicate mail_db waw):

This is not a typo, the request was served in 5.87 milliseconds. It might have to do with the fact that my PC happens to be located less than 1 kilometer (and so, also less than 1 mile, conveniently for fans of all systems of measurement) from the Equinix's datacenter where the request was processed. But this is the whole point of pushing data to the edge! The last mile matters, and if you place your data at the edge, replicated to many locations, you improve the experience for more and more users.
#What's next?
Try Turso yourself, I'm sure you'll have as much fun with it as I did! Turso has an always-free tier with limits that are perfectly good enough for a disposable email server. And remember to always use https://sorry.idont.date for all throwaway mail from now on!