Creating a multitenant SaaS service with Turso, Remix, and Drizzle
Building a multitenant SaaS website where each user gets their own Turso database by leveraging Turso's numerous database offering.

During its launch week, Turso announced that it is radically increasing the database offering to its users, 500 databases for the free tier and 10,000 databases for the scaler plan. What would be the best way to make use of all of these databases other than building a multi-tenant Software as a service (SaaS) system, in the process reducing query response times for each tenant.
In this blog post, we're going to learn how to create a Customer Relationship Management (CRM) service using Remix, Turso, and Drizzle.
Turso is the distributed database based on libSQL, the open-contribution fork of SQLite.
Remix is a full stack web framework that lets you focus on the user interface and work back through web standards and deliver fast, slick, and resilient user experiences.
Drizzle is a TypeScript Object-Relational Mapping tool (ORM) with support for PostgreSQL, MySQL, and SQLite databases.
The CRM service that we'll be building will first let organizations create accounts and onboard agents, secondly it will let agents manage tickets opened by customers, and will finally let customers open tickets and communicate with organizations.
Each organization in the CRM service we're building will have its own database that comprises of the following four tables:
- agents: Stores records of organization agents
- tickets: Stores records of tickets opened by customers
- conversations: Stores records of conversations between organization agents and customers
- messages: Stores records of conversation messages
(The links in the above table names redirect to the respective table schema)
The records of all organizations in the CRM service together with their individual user and database access credentials will all be kept in a single “organizations” table for simplicity.
The tenants in this scenario are the organizations that are using the CRM service to communicate with their customers. For the rest of this tutorial the two terms will be used interchangeably.
TLDR; The complete source code to the project that we are building can be found of GitHub.
Let's get to building.
Pre-requisites:
The prerequisites for this tutorial are:
- An installation of the latest LTS version of node.js.
- An installation of the latest version of the Turso CLI.
#Setting up the Remix Project
Create a new Remix project by running:
npx create-remix@latest turso-crm
Afterwards, cd into the project's directory and run npm install to install the project's dependencies.
The final version of the website we're building uses TailwindCSS, set it up by following the instructions provided in the Remix docs.
The CRM service website is going to have the following pages.
- The landing page (_index.tsx) - Lists the organizations that customers can open tickets and communicate with. It also hosts links to organization registration and authentication.
- Organization
- Login page: Organization's authentication page
- Registration page: Organization's registration page
- Dashboard page: Organization's dashboard page
- Conversation observation page: Agent-customer conversation observation page
- Agent
- Login page: Agent authentication page
- Dashboard page: Agent dashboard page
- Conversation page: Agent-customer conversation page
- Customer
- Ticket opening page: Customer's ticket opening page
- Conversation page: Customer-agent conversation page.
The pages listed above link to their respective Remix route files as found on GitHub.
Use the file names found in the GitHub repository in the links above to create route files for the Remix app, place the route files inside the “app/routes” directory.
Per the route file naming shown above, the organization and agent routes use an _agent.tsx and _org.tsx root route files respectively.
In the website, we are using a cookie-based session authentication system as provided by Remix's createCookieSessionStorage helper function.
#Setting up Drizzle
Since we'll be using Drizzle to build and issue queries within the site's pages, let's set it up by installing its dependencies.
Run the following command to install the Drizzle dependencies.
npm install drizzle-orm @libsql/client
npm install -D drizzle-kit tsx
Let's then create two schema files. For the CRM service database we'll have the following Drizzle schema placed inside “drizzle/schema.ts”.
// drizzle/schema.ts

import { sql } from 'drizzle-orm';
import {
  index,
  integer,
  sqliteTable,
  text,
  uniqueIndex,
} from 'drizzle-orm/sqlite-core';

export const organizations = sqliteTable(
  'organizations',
  {
    id: text('id').primaryKey(),
    name: text('name').notNull(),
    website: text('website').notNull(),
    username: text('username').notNull(),
    email: text('email').notNull(),
    password: text('password').notNull(),
    logo: text('logo'),
    dbUrl: text('db_url'),
    createdAt: integer('created_at').default(sql`(cast(unixepoch() as int))`),
    updatedAt: integer('updated_at').default(sql`(cast(unixepoch() as int))`),
  },
  (authors) => ({
    emailIdx: uniqueIndex('email_idx').on(authors.email),
    usernameIdx: uniqueIndex('username_idx').on(authors.username),
    nameIdx: index('name_idx').on(authors.name),
  }),
);
And, for the tenant databases, we'll have this Drizzle schema which we'll place inside the “org-schemas.ts“ file under the “drizzle” directory.
Next, add the following package.json scripts.
"drizzle:generate": "drizzle-kit generate:sqlite --out ./drizzle/migrations --breakpoints --schema=./drizzle/schema.ts",
"drizzle:generate:orgs": "drizzle-kit generate:sqlite --out ./drizzle/migrations-orgs --breakpoints --schema=./drizzle/org-schema.ts",
With these two scripts set up, generate the SQLite schemas which we'll later migrate to our databases by running:
npm run drizzle:generate
npm run drizzle:generate:orgs
You should see the generated SQLite files under “/drizzle/migrations” and “/drizzle/migrations-orgs” directories respectively.
#Setting up Turso
With Drizzle set up, it's time to set up Turso.
Let's start off by creating the database for the CRM service that will keep records of all the tenants, including their database and authentication information.
turso db create turso-crm
To work with multiple databases, such as in the scenario of the service we're building, we need a way to authenticate queries to all the databases from a single authentication token. We can create such a token for the CRM service by running the following command.
turso db tokens create turso-crm --group
Next, get the URL of the CRM service database.
# database URL
turso db show --url turso-crm
Afterwards, store the obtained values as environment variables inside a .env file at the root of the project.
TURSO_URL=<OBTAINED_URL>
TURSO_AUTH_TOKEN=<CREATED_TOKEN>
Set up two database client instance initiating functions which will help us construct and issue Drizzle queries to Turso, one for the CRM service and the other for the tenants organization databases.
For the CRM service database, create a “client.ts” file under “app/lib” and add the following code.
// app/lib/client.ts

import { drizzle } from 'drizzle-orm/libsql';
import { createClient } from '@libsql/client/http';
import * as schema from '../../drizzle/schema';

interface Env {
  TURSO_DB_AUTH_TOKEN?: string;
  TURSO_DB_URL?: string;
}

export function buildDbClient() {
  const url = (process.env as unknown as Env).TURSO_DB_URL?.trim();
  if (url === undefined) {
    throw new Error('TURSO_DB_URL is not defined');
  }

  const authToken = (process.env as unknown as Env).TURSO_DB_AUTH_TOKEN?.trim();
  if (authToken === undefined) {
    if (!url.includes('file:')) {
      throw new Error('TURSO_DB_AUTH_TOKEN is not defined');
    }
  }

  return drizzle(createClient({ url, authToken }), { schema });
}
And, for the tenant databases, create a “client-org.ts” file under the same directory and in it add the following code.
// app/lib/client-org.ts

import { drizzle } from 'drizzle-orm/libsql';
import { createClient } from '@libsql/client/http';
import * as schema from '../../drizzle/org-schema';

interface Env {
  url: string;
  TURSO_DB_AUTH_TOKEN?: string;
}

export function buildDbClient({ url }: Env) {
  if (url === undefined) {
    throw new Error('db url is not defined');
  }

  const authToken = (process.env as unknown as Env).TURSO_DB_AUTH_TOKEN?.trim();
  if (authToken === undefined) {
    throw new Error('TURSO_DB_AUTH_TOKEN is not defined');
  }

  return drizzle(createClient({ url: `libsql://${url}`, authToken }), {
    schema,
  });
}
As you can see, the database client initiating function for the CRM service is using the environment variables that we generated earlier, while that of the individual tenants requires the database URL as an argument passed to it.
We've set the tenant function this way since at build time we do not know the database URLs of the tenant databases. The databases will first need to be created for us to obtain their URLs.
We'll have a look at this in the next section.
Before proceeding, let's first migrate the schema of the CRM service database.
Create a “migrate.ts” file inside the “drizzle” directory and inside it add the following code.
// drizzle/migrate.ts

import 'dotenv/config';
import { migrate } from 'drizzle-orm/libsql/migrator';
import { drizzle } from 'drizzle-orm/libsql';
import { createClient } from '@libsql/client';

export const client = createClient({
  url: process.env.TURSO_DB_URL as string,
  authToken: process.env.TURSO_DB_AUTH_TOKEN as string,
});

export const db = drizzle(client);

async function main() {
  try {
    await migrate(db, {
      migrationsFolder: 'drizzle/migrations',
    });
    console.log('Tables migrated!');
    process.exit(0);
  } catch (error) {
    console.error('Error performing migration: ', error);
    process.exit(1);
  }
}

main();
Then, add the following package.json script.
"drizzle:migrate": "tsx drizzle/migrate"
We can then perform the database migration by running npm run drizzle:migrate.
Verify the migration by checking if the “organizations” table was added to the database.
turso db shell turso-crm ".tables"
You should see the “organizations” table listed among the results.
#Creating Turso databases for individual tenants
In the CRM service, every tenant that registers for the service gets their own database.
To maintain some type of order, each ternant's organization database name will be constructed by combining the name of the CRM service database followed by the username of the registered tenant's account, the two being separated by a dash. E.g for a tenant with the username “foo” the database name will be “turso-crm-foo”. To ensure this naming convention, all organization usernames are limited to alphanumeric characters without the underscore.
To create databases on the fly (without using the Turso CLI) we need to make use of the Turso REST API.
To use the Turso REST API we'll first need to create a platform API token that needs to be passed in the “Authorization“ header for all API requests, this is because the Turso REST API doesn't permit unauthenticated requests.
Run the following command to mint a Turso platform API token.
turso auth api-tokens mint turso-crm
Store the obtained value inside the .env file, assigning it to the TURSO_API_TOKEN key.
TURSO_API_TOKEN=<OBTAINED-API-TOKEN>
Let's set up a few more environment variables which will help us with the next steps of this tutorial. (Project's environment variables template can be found in this file)
APP_NAME=turso-crm
TURSO_API_URL=https://api.turso.tech
APP_ORGANIZATION=<YOUR_GITHUB_USERNAME>
SESSION_SECRET=B4428F73-67C3-4285-8ADD-28CC93B2F79D
APP_PRIMARY_LOCATION=sjc # can be any valid location
APP_GROUP=default # use custom group name if created one for the service in the scaler and entereprize plans
Here's an explanation for the above environment variables:
- APP_NAME: This is the name of the application we're creating, same as the name of the CRM service database. This will be used to prefix all created tenant databases.
- TURSO_API_URL: This is the base URL to the Turso REST API
- APP_ORGANIZATION: This is the slug name of your organization on Turso. Assign the slug name of a specific organization that you've created or you can use your GitHub username since Turso sets that up as your default organization name.
- SESSION_SECRET: This is the secret used to sign/unsign the value of cookies used in the Remix website's authentication.
- APP_PRIMARY_LOCATION: The Turso location id to the primary location of your Turso databases. Get the Turso supported locations by running
turso db locations. - APP_GROUP: The group that the multitenant databases will belong to. (“default” is the default group name for the starter plan)
Inside the CRM service website, we are creating new databases for tenant organizations after a user has successfully registered for a new organization account.
This is done inside the createOrganizationDatabase() utility function.
In the createOrganizationDatabase() function, we are using the Turso REST API to create a database for a registered tenant organization, placing it inside a specific group (“default” for the starter plan) and primary location. Finally, we migrate the database with the tenant database schema we created earlier.
The database URL of the created database is stored as part of the organization's registration details.
#Issuing commands inside the website pages
Beyond leveraging the Turso REST API to create databases, inside the Remix app pages we are generally issuing Drizzle queries to our Turso databases.
#Organization dashboard
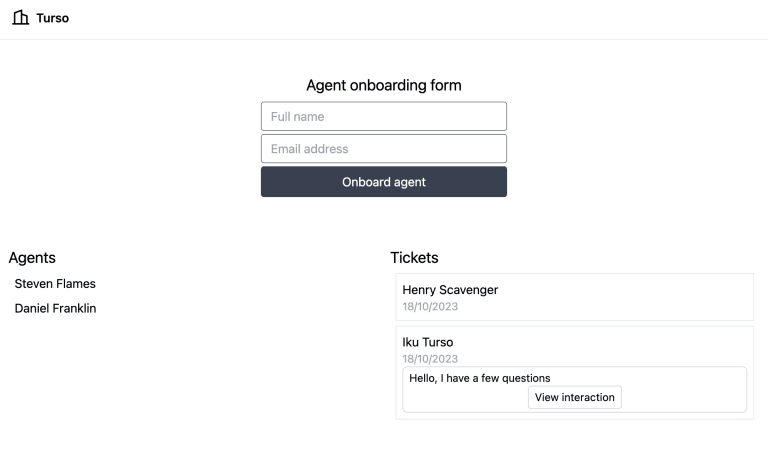
In the organization dashboard page loader function, we are fetching all the tickets and agents that are found inside the organization database and passing them to the page component to be displayed.
The getOrganizationDetails() function in the page's loader function fetches the organization details from the CRM service's database (turso-crm) “organizations” table by using the organization ID obtained from the authentication cookie.
This page also lets the authenticated tenant onboard new agents to the organization by submitting the agent information to the action function found within the “app/routes/org-action.tsx” route endpoint.
From the dashboard you can also peek into the interactions between your agents and customers.
Here's the preview of the organization dashboard page.
#Agent dashboard page
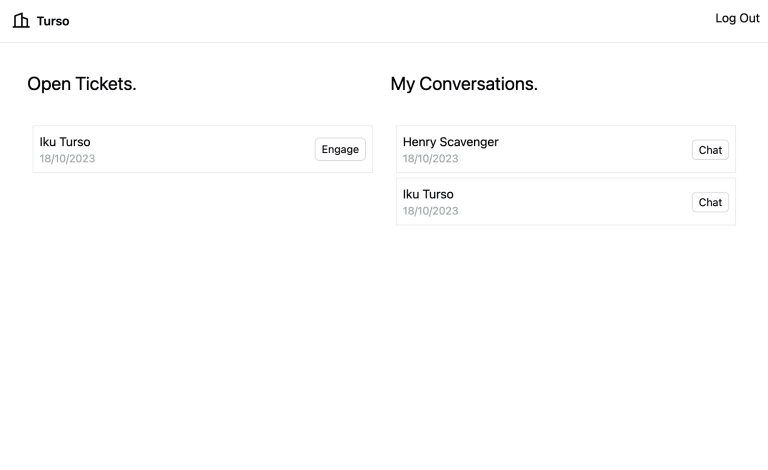
In the agent's dashboard page loader function, we are fetching the open tickets belonging to an organization and the agent's conversations then passing them to the page component to be displayed.
The getAgentDetails() function in the agent's dashboard page loader function fetches the agent's details from the organization's “agents” table by using the agent ID obtained from the authentication cookie.
In this page, the agent can engage with open customer tickets and in doing so start new conversations.
Here's a preview of the agent's dashboard page
#Agent conversation page
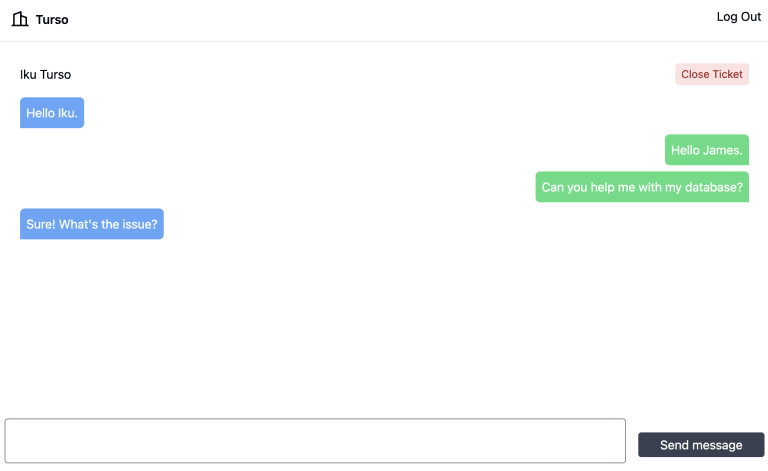
When an agent engage's a new ticket, they are taken to the conversation page. The conversation page's loader function fetches the details of a conversation and passes this information to the page component.
In the conversation page, the agent can chat with customers so as to get to the bottom of issues that customers are facing.
After having resolved a customer's issue, the agent can opt to close the ticket by clicking the “Close Ticket” button.
Here is the preview of the agent's conversation page.
#Customer open ticket page
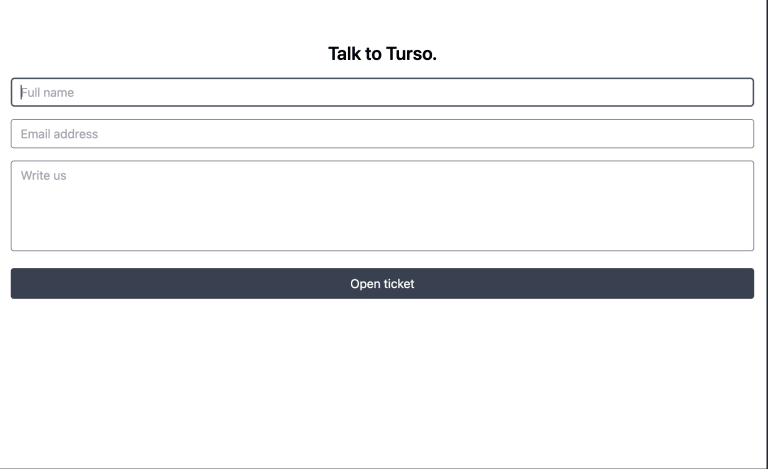
Customers can open issue tickets in organizations by visiting the links to the organizations as found on the CRM service website's landing page.
Inside the ticket opening page, they'll find a form that will let them fill in their information, document their issues, and open tickets within organizations.
In the loader function of this page, we are fetching an organization's details based on the organization's username provided as part of the page's path parameters. We then pass the organization information to the page component to be used to display the organization's information inside the page viewed by the user.
Here's is the preview of the customer's ticket opening form
#Customer conversation page
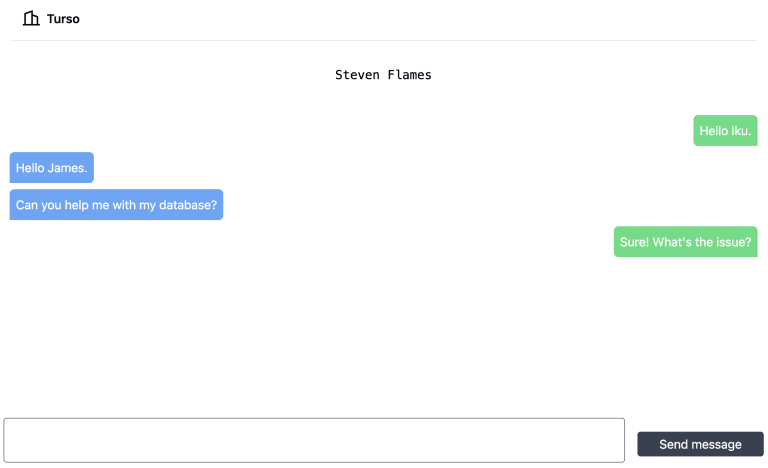
Similar to the agent's conversation page, the customer conversation page's loader function fetches the details of a conversation and passes this Information to its page component.
One possible implementation that could be set for the customer to receive the link to the conversation page (not demonstrated in this example) would be email integration, whereby an email can be sent to the customer once an agent engages with their opened ticket.
Here's a preview of the customer's conversation page.
#Summary
To summarize, we've built a CRM SaaS that assigns every registered tenant their own database while having a single database that keeps records of all the registered tenants and in turn their individual databases.
We've learned how to create a new Remix project, add pages, fetch, and display data to users.
We've set up and used Drizzle to create database schemas and build queries that we use to transact data to and fro the Turso databases within our website's pages.
We've also learned how to create Turso platform API tokens and used them to send authenticated requests to the Turso REST API to create new databases.
You can find the source code to the CRM SaaS we've built in this GitHub repository.
This brings us to the end of this tutorial that demonstrates one of the many possible use cases for leveraging Turso's numerous database offering, in this case the building of a CRM SaaS service.
Visit the following links to learn more about the tech stack used in this tutorial.