Use SQLite triggers to send new user emails
Learn how to use SQLite triggers to send new user emails with Cloudflare.

SQLite triggers execute predefined SQL code in response to events occuring in the database. These events are triggered by INSERT, UPDATE and DELETE actions, and can be triggered to happen before or after the event.
Triggers allow you to maintain data integrity, enforce business rules, and automate certain operations.
Creating a trigger looks something like this:
CREATE TRIGGER trigger_name
[BEFORE|AFTER] [INSERT|UPDATE|DELETE] ON table_name
BEGIN
    -- SQL statements to execute
END;
#Why are triggers useful?
Triggers are useful for a variety of reasons:
- Cross-Table Updates: When data in one table changrs, triggers can automatically update data in other tables.
- Audit Logging: Triggers can automatically log the changes to tables, creating an audit trail of who changes what and when.
- Automated Actions: Triggers can be used to automate actions such as sending notifications, updating related records, or updating summary tables.
Other use cases include performance, and validation, making sure data is correct before it is inserted into the database.
In this post we will explore — Automated Actions to implement the following:

#Your database
You should have a Turso database already to follow along. If not, create one with some schema that looks like this:
CREATE TABLE users (
  id INTEGER PRIMARY KEY AUTOINCREMENT,
  email TEXT NOT NULL,
  created_at TIMESTAMP DEFAULT CURRENT_TIMESTAMP
);
If you already have one, perfect! Make sure it has an email column.
#Create a table to track new users
Now create an additional table new_users to track new users:
CREATE TABLE new_users (
  user_id INTEGER PRIMARY KEY,
  email TEXT NOT NULL,
  created_at TIMESTAMP DEFAULT CURRENT_TIMESTAMP
);
This table will be managed by the trigger, and our cronjob.
#Create a SQLite trigger
Now CREATE TRIGGER that inserts into the new_users table the values of the NEW record being inserted into user:
CREATE TRIGGER track_new_users
AFTER INSERT ON users
BEGIN
  INSERT INTO new_users (user_id, email)
  VALUES (NEW.id, NEW.email);
END;
#Insert some example data
Insert some example data into users:
INSERT INTO users (email)
VALUES
    ('jamie@turso.tech'),
    ('glauber@turso.tech'),
    ('michael@turso.tech');
Query the new_users table to see the data automatically added by the trigger on the users table:
SELECT user_id, email, created_at
FROM new_users
ORDER BY created_at DESC;
This doesn't seem useful right now, but we'll next create a cronjob using Cloudflare Workers that fetches data from the database every two minutes, sends an email, and removes the processed users from the table.
#Setup Cloudflare Workers
You will want to create a new Cloudflare Workers project using the cloudflare CLI:
npm create cloudflare@latest turso-worker
cd turso-worker
Cloudflare also makes it super easy to connect your Turso database using the Cloudflare Dashboard — learn more.
If you want to follow along without using the dashboard, you can configure the environment variables manually.
Create the file .dev.vars, add it to .gitignore, and add your database URL and Auth Token to it:
TURSO_DATABASE_URL="libsql://..."
TURSO_DATABASE_AUTH_TOKEN="..."
Once connected, you get the following environment variables added to your workers env context:
TURSO_DATABASE_URLTURSO_DATABASE_AUTH_TOKEN
#Create a cronjob
We will now create a cronjob that will run every 5 minutes to send an email to new users.
Begin by installing the @libsql/client package:
npm install @libsql/client
Then inside your worker, add the scheduled function:
import { createClient } from '@libsql/client';

export interface Env {
  TURSO_DATABASE_URL?: string;
  TURSO_DATABASE_AUTH_TOKEN?: string;
}

export default {
  async scheduled(event, env, ctx) {
    const db = createClient({
      url: env.TURSO_DATABASE_URL,
      authToken: env.TURSO_DATABASE_AUTH_TOKEN,
    });

    const newUsers = await db.execute('SELECT * FROM new_users');

    // Do something with new users
  },
} satisfies ExportedHandler<Env>;
#Sending emails
Next, you can send an email to each new user and delete them from the new_users table so we don't keep sending them emails:
for (const user of newUsers.rows) {
  await db.execute({
    sql: 'DELETE FROM new_users WHERE user_id = ?',
    args: [user.user_id],
  });

  await sendEmail(user.email);
}

async function sendEmail(email) {
  // You can use Cloudflare's Email Worker or a third-party email service
  console.log(`Sending email to ${email}`);
}
You might consider using Cloudflare Queues to process the emails, and removing the user from the new_users table, ensuring they are retried if necessary.
The final worker code should look something like this:
import { createClient } from '@libsql/client';

export interface Env {
  TURSO_DATABASE_URL?: string;
  TURSO_DATABASE_AUTH_TOKEN?: string;
}

export default {
  async scheduled(event, env, ctx) {
    const db = createClient({
      url: env.TURSO_DATABASE_URL,
      authToken: env.TURSO_DATABASE_AUTH_TOKEN,
    });

    const newUsers = await db.execute('SELECT * FROM new_users');

    for (const user of newUsers.rows) {
      await db.execute({
        sql: 'DELETE FROM new_users WHERE user_id = ?',
        args: [user.user_id],
      });

      await sendEmail(user.email);
    }
  },
} satisfies ExportedHandler<Env>;

async function sendEmail(email) {
  // You can use Cloudflare's Email Worker or a third-party email service
  console.log(`Sending email to ${email}`);
}
How you send emails is up to you.
Cloudflare Workers comes with the ability to send emails using Cloudflare Email Workers, or you can use a third-party email service like Resend.
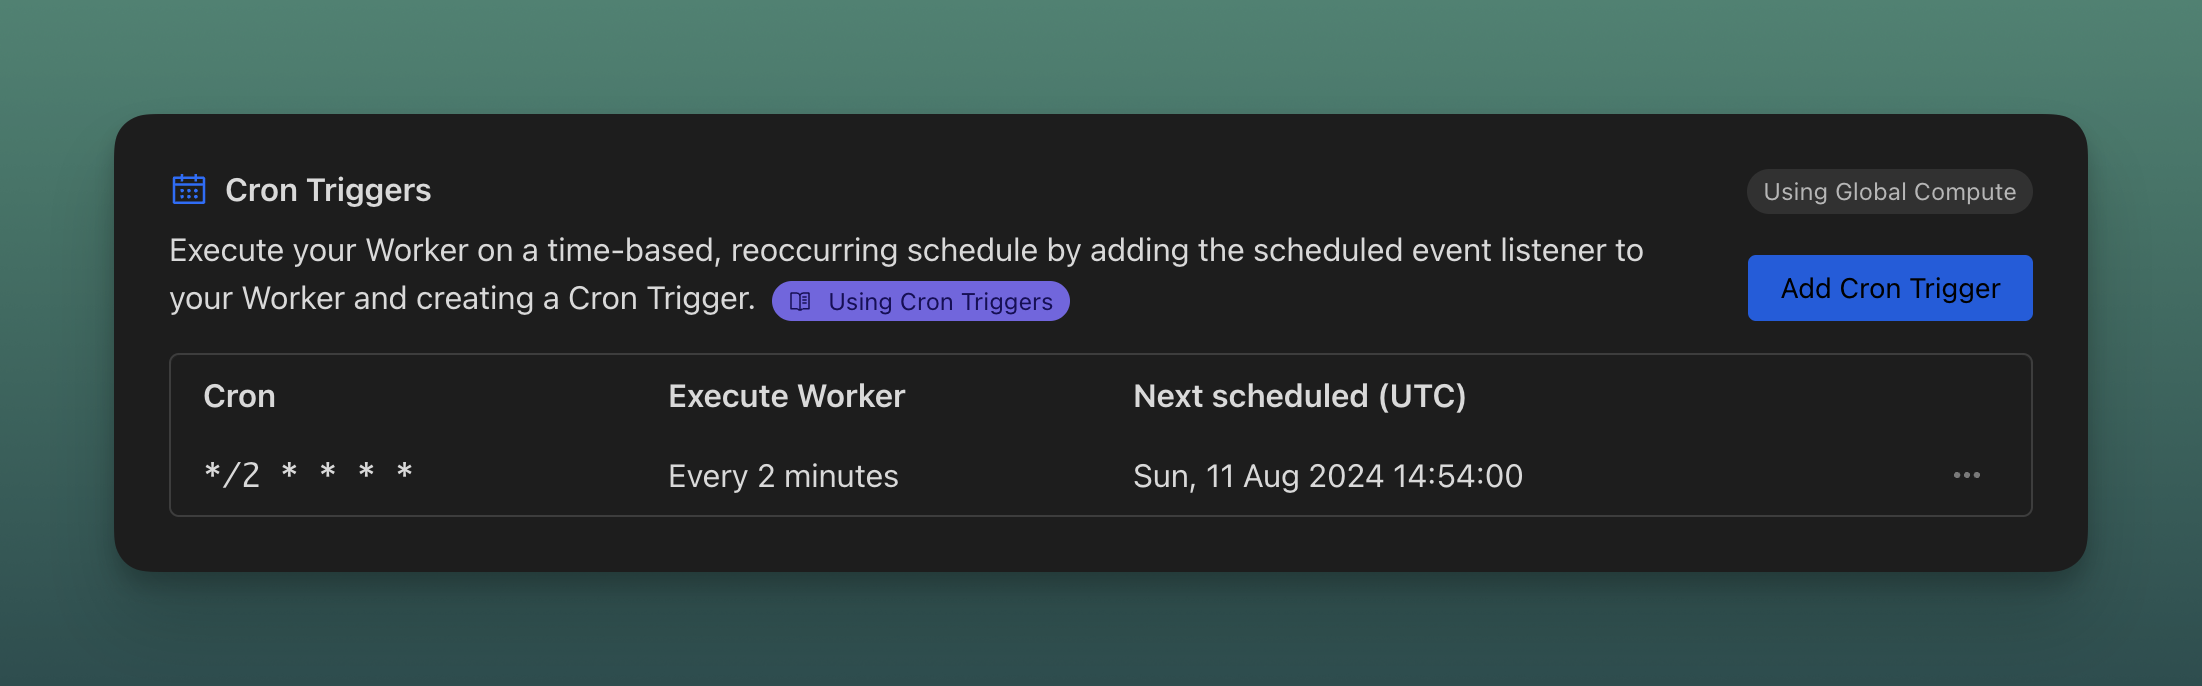
#Configure Cron Trigger
Finally, you will want to configure the Cron Trigger to run every two minutes inside wrangler.toml:
[triggers]
crons = ["*/2 * * * *"]
#Deploy to production
Before you deploy to production, make sure to set your environment variables:
npx wrangler secret put TURSO_DATABASE_URL
npx wrangler secret put TURSO_DATABASE_AUTH_TOKEN
Then deploy your worker:
npm run deploy
You should see the worker deployed, including the schedule in the response:
Total Upload: 136.34 KiB / gzip: 28.43 KiB
Worker Startup Time: 5 ms
Uploaded sqlite-triggers (3.68 sec)
Published sqlite-triggers (3.10 sec)
  https://sqlite-triggers.launchmade.workers.dev
  schedule: */2 * * * *
Current Deployment ID: 97603d31-4a9c-4028-ab27-fe37c6fd71bb
Current Version ID: 97603d31-4a9c-4028-ab27-fe37c6fd71bb
If you open the Cloudflare Dashboard, you should see inside your worker the schedule set to run every two minutes:
#Going further
This example covers the basics of using SQLite Triggers to store new users in a separate table and using Cloudflare Workers to send emails to new users.
It's worth noting that this approach will incur additional rows read and written to your Turso Database.
If you're dealing with a high volume of new users, you might want to only invoke the cronjob (by moving it to a regular worker) when an insert event occurs on the new_users table using the libSQL /listen endpoint — learn more.
Alternatively, you might want to skip the trigger table entirely, and send all requests to Kafka at the time you execute SQL. We'll learn about that in another post.