Reliable state in Cypress tests using Turso's libSQL driver
While performing e2e tests can be a pain, here's how Turso and it's libSQL SDK can still offer reliable state when performing e2e tests with Cypress.

When performing end-to-end tests we normally try to set up test environments to mirror the production environment as much as possible. It is essential to do so since it helps increase the level of confidence in our tests and ultimately our apps' performance and user experience. This is more true when dealing with dynamic front end apps which are likely to be decoupled from their state, that tends to be delivered in JSON from the app servers, a popular practice lately.
App state is an important aspect to manage within tests so as to have the full experience of the app being tested, and there are a number of approaches that can be used to simulate state within tests. These approaches depend on the testing suites being used and the APIs that provide data to our apps.
In this post, we are going to learn how to confidently test dynamic front end apps using Cypress and the libSQL driver used to make transactions with Turso.
Cypress is one of the popular web application testing suites that lets developers create tests, run and debug them visually, and automatically run them in our Continuous Integration(CI) platforms.
Turso is the edge database based on libSQL, the open-source open-contribution fork of SQLite.
Turso is a good database candidate for the production phase of the app being tested in the scenario of this blog since the libSQL driver used to perform transactions in the production environment also lets us work with local SQLite file databases. This means that we get to use the same logic used in production to simulate state management during tests. Also, since Turso is built on SQLite we can have more confidence in our tests since we are dealing with the same database and data types on our tests as in production.
Here are some reasons why we find merit in using local databases while running end-to-end tests with Cypress and Turso (SQLite):
- There would be no need to provision databases in CI (contrast to using other non-SQLite database options) and dealing with all that comes with them including failures, which might make tests slower, flaky, etc.
- Running tests with remote databases would consume your usage quota, which also happens to be the case even in developer plans.
- Although provisioning serverless databases would be easier e.g in the case of Turso; It would still consume some time (~10s in the case of a single database). When the tests get complex and isolation is required the effect would be significant, which might result in the tests being flaky, especially when running multiple tests in parallel.
- Due to security and DevOps culture in some companies, where in some cases everything must be done locally, this stack would be ideal.
- As an extension of the above point, there are large enterprises that have locked-down behind-the-firewall CI pipelines (mainly with Jenkins setups) and can't access external infrastructure, again, the Cypress-Turso stack would be one of the suitable local-in-tests and external-in-production database options of choice.
For all these above scenarios and on a business outlook, using Turso in production and SQLite in a local setup all made possible using the same driver would be a good option to consider.
And, considering all the points made above, we'll by definition not be implementing “true” end-to-end tests since we won't be dealing with transactions with external databases during tests, that also happens to be the case for teams under these scenarios.
Also, we'll be using GitHub Actions for CI later in this post (simply for its simplicity) and that might not be the best demonstration for most of the cases laid above, but they still remain valid.
We will be using the Top Web Frameworks project that already uses Turso as its database (and the libSQL driver) to integrate the Cypress tests in this blog.
#Setting Cypress on a project
First, fork the project's repo from GitHub, and clone into your machine. Follow the instructions on the project's README to set up the database, and finalize by cd ing into the project directory and running npm install . Afterwards, perform the following steps to set up Cypress tests in our project:
Run npm install to install the project's dependencies.
Install Cypress by running npm install — save-dev cypress. We are installing the typescript module since it's a dependency for using TypeScript within Cypress.
Set up scripts to streamline running commands in the project environment.
"scripts": {
 "cypress:open": cypress open",
 "cypress:run": "cypress run"
}
The cypress open command opens up the Cypress visual tests window. On initial setup, it will help you set up the Cypress environment for your project.
Run npm run cypress:open to initiate Cypress.
This is the first window that we'll see on Cypress.
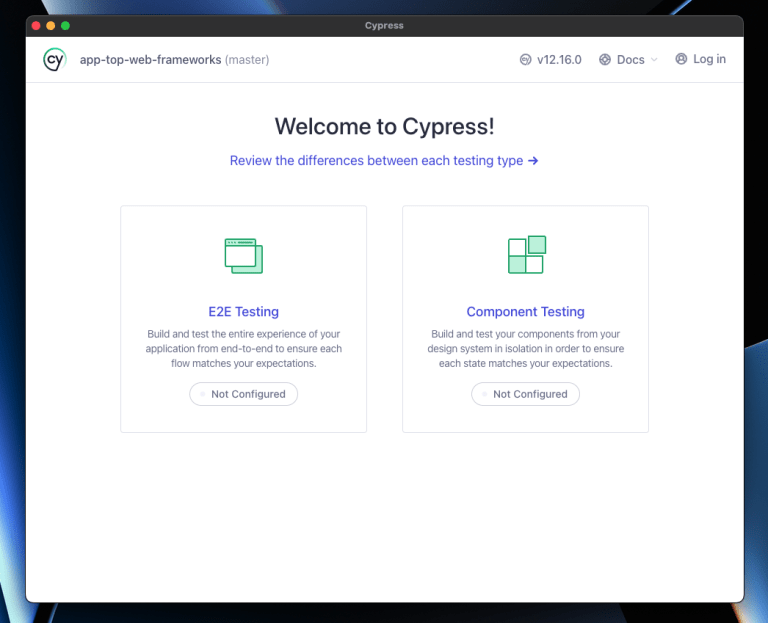
Click on “E2E Testing” to proceed since that's the test setup we'll be dealing with.
Next, you'll be taken to the Cypress configuration window, where Cypress will show you the configuration files that it has added to our project.

Click on the “Continue” button to proceed to the next step.
On the step that follows, you'll be asked to choose from a list of Cypress supported browsers installed on your machine on which you'd want to see the tests performed. Select your preferred browser and click on the “Start E2E Testing in browser” button.
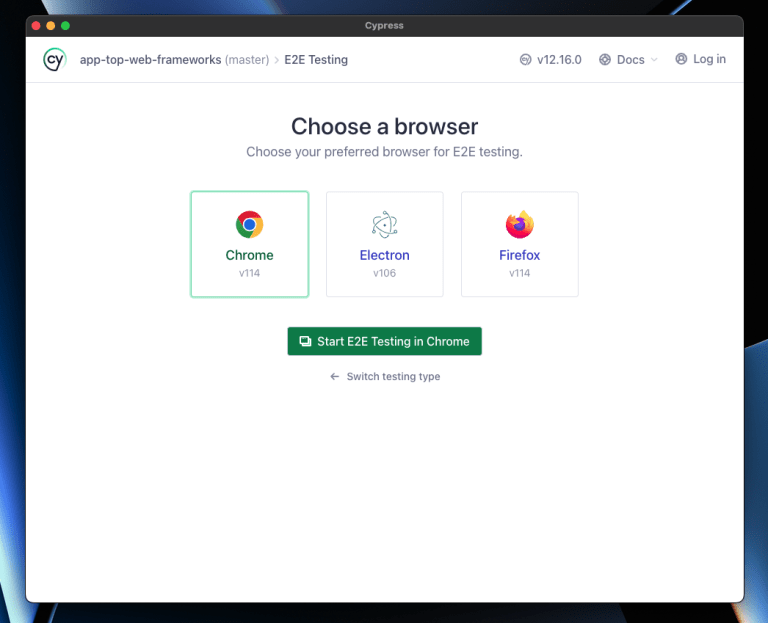
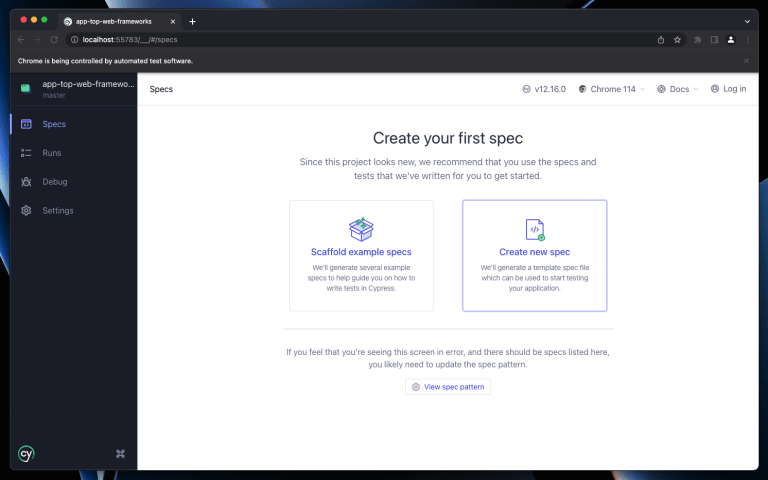
Next, we'll be creating our first test spec for our project from the newly opened browser window that displays the Cypress dashboard. Go on and click on the “Create new spec” card.
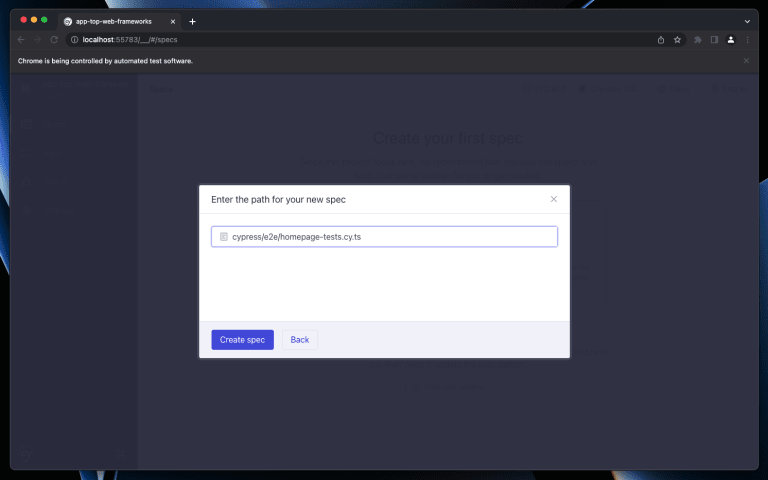
On the resulting modal, go ahead and give the new spec file the name cypress/e2e/homepage-tests.cy.ts. Next, click on “Create spec”.
On the screen that follows, which gives a preview of the created cypress/e2e/homepage-tests.cy.ts spec file, click on “Okay, run this spec”.
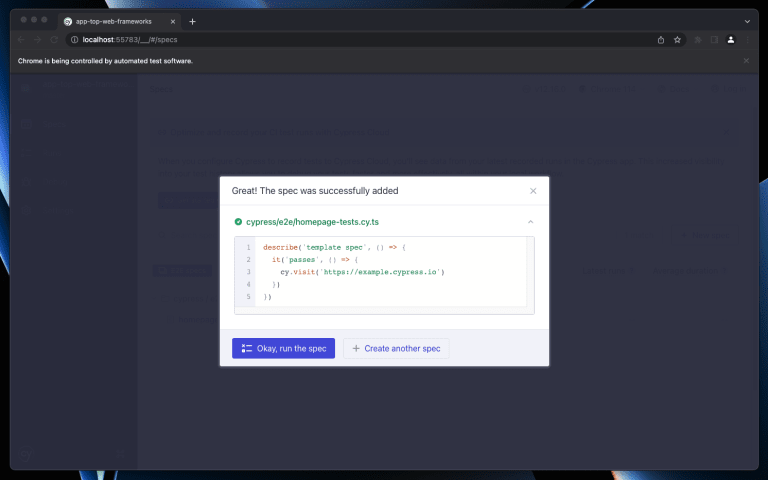
You should see a successful test afterwards. We can then head back to our project and set up the homepage test.
By now, Cypress would have added a cypress.config.ts file that as the name entails is where you configure Cypress for your project. Also, a new /cypress directory will have been created at the root of the project where your tests files will reside, including directories to test screenshots and videos when performing local tests.
#Writing tests
After having configured Cypress for our project, we can go ahead and set up the assertions about the resulting application state.
For this project, we are going to run tests spread into four different spec files, two that are database integration centered, and the rest on the user interface (UI).
- Database integration: The home page spec and the add-new page spec
- UI: Site navigation on the app template and the about page navigation links
For brevity, we'll focus on the two database integration tests inside this post, to see the ui tests, look at the code on GitHub.
#The home page tests
Within the home page, our focus will be on trying to see if data is being successfully fetched from our database by ensuring that the frameworks are listed. These are the assertions expression that we'll be setting up:
- Navigate to and check that we are on the home page.
- Check that we have a table, rightly captioned, listing the frameworks from the database and that the row count is not zero.
- Pick a random row and check to see that the repository link is a GItHub repository link.
To put this in code, open the cypress/e2e/homepage-tests.cy.ts file, delete the default code added while setting up Cypress, and replace it with the following:
describe("Home page", () => {
  context("Given that we access the `/` page", () => {
    beforeEach(() => {
      cy.visit("/");
    });

    it("The H1 heading should contain the correct heading", () => {
      cy.get("h1").contains("Top Web Frameworks");
    });
    it("There should be a table listing the frameworks", () => {
      cy.get("table > caption").contains("The list of top web frameworks");
    });
    it("There are items on the listing table", () => {
      cy.get("tbody > tr").children().should("not.eq", 0);
    });
    context("The `Visit` link of a framework listing", () => {
      const githubUrlRgx =
        /((?:https?:)?\/\/)?((?:www)\.)?((?:github\.com))(\/(?:[\w-]+))(\/(?:[\w-]+))(\/)?/gi;
      it("All listings should contain a link to a GitHub repository", () => {
        cy.get("tbody > tr").each((_$el, index, _$list) => {
          cy.get(
            `tbody > :nth-child(${
              index + 1
            }) > :last-child > a[title="GitHub link"]`
          )
            .contains("Visit")
            .and("have.attr", "href")
            .should("match", githubUrlRgx);
        });
      });
    });
  });
});
The assertions in the above code do what we laid out above. The randomBetween() function being imported and used in this code is a simple random number generating function that takes two numbers specifying a range.
Next, go to the cypress.config.ts file and set the baseUrl variable to the LOCAL_SITE_URL environment variable inside the e2e tests configuration object.
import { defineConfig } from "cypress";

export default defineConfig({
  e2e: {
    baseUrl: process.env.LOCAL_SITE_URL, // set baseUrl
    setupNodeEvents(_on, _config) {
      // implement node event listeners here
    },
  },
});
Then update the cypress scripts created earlier, adding the environment variables.
"cypress:open": "LOCAL_SITE_URL=http://localhost:3000 cypress open",
"cypress:run": "LOCAL_SITE_URL=http://localhost:3000 cypress run"
With the local server still running on one terminal tab, open another one and run npm run cypress:open. You should see the Cypress window come up, click on “E2E Testing” > Pick a browser, then click on “Start E2E Testing in [browser]”. On the resulting browser tab. You should see the spec files list again. Open the homepage-tests.cy.ts spec file and you should see the following:

#The add-new page tests
For the /add-new page we'd like to make the following assertions:
- After visiting the page, check if we're in the correct page, with the h1 supposed to have the text “Submit a framework”
- Check that we have a form with the name, language, GitHub url, and GitHub stars count input fields.
- Check that we are given corresponding messages to form submissions with missing fields.
- Test framework submission
- Try adding a demo framework by filling and submitting the form , then
- Go to the homepage and check if the added framework is listed on the frameworks table
Create a new spec file under /cypress/e2e/ naming it add-new-page-tests.cy.ts .
And, since we will be running recurring tests that check for resulting errors when a form field is not filled, instead of repeating code we will need to create a function that takes care of the form filling, submission, and error message check. Cypress lets us do this via custom commands.
To create one, open the commands.ts file under the cypress/support directory and add the fillInFrameworksForm() custom command.
Cypress.Commands.add(
  "fillInFrameworksForm",
  (
    fields: {
      name: string | undefined;
      programmingLanguage: string | undefined;
      githubLink: string | undefined;
      githubStarsCount: string | undefined;
    },
    message = undefined
  ) => {
    cy.visit("/add-new");
    if (fields.name !== undefined) {
      cy.get('form > div > input[data-cy="name"]')
        .type(fields.name)
        .should("have.value", fields.name);
    }
    if (fields.programmingLanguage !== undefined) {
      cy.get('form > div > input[data-cy="programming-language"]')
        .type(fields.programmingLanguage)
        .should("have.value", fields.programmingLanguage);
    }
    if (fields.githubLink !== undefined) {
      cy.get('form > div > input[data-cy="github-link"]')
        .type(fields.githubLink)
        .should("have.value", fields.githubLink);
    }
    if (fields.githubStarsCount !== undefined) {
      cy.get('form > div > input[data-cy="github-stars-count"]')
        .type(fields.githubStarsCount)
        .should("have.value", fields.githubStarsCount);
    }

    cy.get('form > div > button[data-cy="submit"]').click();
    if (message !== "") {
      cy.get("#submission-status-message").should("include.text", message);
    }
  }
);
We can then use the created command by chaining it to the cy object in the format — cy.<custom-command-name> within tests. Proceeding with the test code in this test file , open the add-new-page-tests.cy.ts file and add the following code.
import { randomBetween } from "../support/utils";

describe('"Add New" page', () => {
  let demoFramework: {
    name: string;
    programmingLanguage: string;
    githubLink: string;
    githubStarsCount: number;
  };

  context("Given that we access the `/add-new` page", () => {
    beforeEach(() => {
      cy.visit("/add-new");

      const id = randomBetween(1, 99);
      demoFramework = {
        name: `Demo ${id}`,
        programmingLanguage: ["JavaScript", "PHP", "Python", "Rust", "Go"][
          randomBetween(0, 4)
        ],
        githubLink: `https://github.com/demo/demo-${id}`,
        githubStarsCount: randomBetween(20000, 99999),
      };
    });

    it("Make sure that all required form fields exist", () => {
      cy.get('form > div > input[data-cy="name"]').should("exist");
      cy.get('form > div > input[data-cy="programming-language"]').should(
        "exist"
      );
      cy.get('form > div > input[data-cy="github-link"]').should("exist");
      cy.get('form > div > input[data-cy="github-stars-count"]').should(
        "exist"
      );
      cy.get('form > div > button[data-cy="submit"]').should("exist");
    });

    context("When the form is submitted with a missing `Name` field", () => {
      it("The correct error message will be displayed", () => {
        const { name, ...noNameField } = demoFramework;
        cy.fillInFrameworksForm(noNameField, "Fill in the: 'name'");
      });
    });

    context(
      "When the form is submitted with a missing `Programming Language` field",
      () => {
        it("The correct error message will be displayed", () => {
          const { programmingLanguage, ...noLanguageField } = demoFramework;
          cy.fillInFrameworksForm(noLanguageField, "Fill in the: 'language'");
        });
      }
    );

    context(
      "When the form is submitted with a missing `GitHub Link` field",
      () => {
        it("The correct error message will be displayed", () => {
          const { githubLink, ...noGHLinkField } = demoFramework;
          cy.fillInFrameworksForm(noGHLinkField, "Fill in the: 'GitHub link'");
        });
      }
    );

    context(
      "When the form is submitted with a missing `Stars Count` field",
      () => {
        it("The correct error message will be displayed", () => {
          const { githubStarsCount, ...noStarsCountField } = demoFramework;
          cy.fillInFrameworksForm(
            noStarsCountField,
            "Fill in the: 'stars count'"
          );
        });
      }
    );

    context("When a new framework is submitted using the form", () => {
      it("It should get listed in the frameworks table on the home page", () => {
        cy.fillInFrameworksForm(demoFramework, "Thanks for your contribution");
        cy.get('nav > a[href="/"]')
          .click()
          .then(() => {
            cy.get("tr").should("contain.text", demoFramework.name);
          });
      });
    });
  });
});
You can see from the above code how essential the custom command has been to the minimization of code repetition.
Before proceeding, we need to set up Types for custom commands when we are using TypeScript (which is the case with the project in question) to avoid TypeScript errors. To do so, create an index.ts file under the cypress/support directory and add the following Type for the created command.
import "./commands";

declare global {
  namespace Cypress {
    interface Chainable {
      /**
       * Custom command to fill in, check form values, check form errors, and submit it
       * @example cy.fillInFrameworksForm({ name, programmingLanguage, githubLink, githubStarsCount })
       */
      fillInFrameworksForm(
        fields: any,
        message: any
      ): Chainable<JQuery<HTMLElement>>;
    }
  }
}
Now we can proceed to run the test but this time using Cypress' headless test. We can invoke headless tests by using the run command on the Cypress CLI which we have declared in the cypress:run script within our project's package.json file. Run npm run cypress:run to execute the test.
By the end of the test, you should have a log output close to the following.
(Run Finished)


       Spec                                              Tests  Passing  Failing  Pending  Skipped
  ┌────────────────────────────────────────────────────────────────────────────────────────────────┐
  │ ✔  addnewpage-tests.cy.ts                   00:08        6        6        -        -        - │
  ├────────────────────────────────────────────────────────────────────────────────────────────────┤
  │ ✔  homepage-tests.cy.ts                     00:01        1        1        -        -        - │
  └────────────────────────────────────────────────────────────────────────────────────────────────┘
    ✔  All specs passed!                        00:09        7        7        -
To see and set up the other tests in the repo open the following links:
#CI integration
Continuous Integration (CI) is the act of automating the integration of code changes from multiple developers into a single repo. If tests fail, CI helps block changes from being integrated into the main repo. This practice gives us confidence that merged changes do not break our apps. CI test errors are also logged to provide us with some feedback to help us debug our code.
Cypress lets us run tests both locally (as we've just seen) and in CI, the latter being essential as it enables us to catch and fix issues within our apps before deployment at a single point for all developers working on an app within the CI/CD pipelines.
Cypress supports a number of CI/CD services but for this article we'll demonstrate how to use it with GitHub Actions.
#Using file database in tests
In the README file of the project we are trying to run our tests on, we had only the instructions on how to set up a Turso database for the project likely for the production environment. But, within CI we would normally avoid working with production data for all the right reasons, hence running tests with the project's default database configuration would be a bad idea. But also, one of the advantages with using Turso, and more specifically its SDKs (like the libSQL driver for JavaScript/TypeScript we are using in this instance) is that they let us work with file databases; more specifically SQLite.
This is great for tests in apps integrated with Turso since we get to deal with the same database and data types in both local and production environments. Let's then proceed by creating a SQLite data dump of our Turso database, which we can later restore into a SQLite file database in CI to be used as the application state when running tests.
Since you followed the instructions on the project's README, the assumption is that you have the Turso CLI installed. You can then run the following command to create a SQLite data dump of the data within Turso.
turso db shell top-frameworks ".dump" > frameworks.sql
After the above command has run, you should have a frameworks.sql file on the root of the project whose queries can be previewed over here.
Add a new script on package.json that will run our app in development mode during the tests in CI.
"scripts": {
  ...
  "tests:dev": "NUXT_TURSO_DB_URL=file:web-frameworks.db NUXT_TURSO_DB_AUTH_TOKEN=none nuxt dev",
  ...
}
This script will run the project's development server while importantly assigning the to be created SQLite database file as the source of application state. It is essential to acknowledge that the libSQL driver is what lets us accomplish this without having to devise any complex implementation during tests simply by having support for both SQLite database files and libSQL sqld instances (including Turso).
#Run Cypress in CI with GitHub Actions
GitHub Actions is a CI/CD service that let's developers automate task builds, testing, and deployment pipelines within GitHub.
In our project we are going to run Cypress tests with GitHub Actions by creating a workflow file defining the jobs to be run when it's triggered, which usually happens when a certain event occurs, e.g when code is pushed to the repo. Create a cypress.yml file under the .github/workflows directory of our project, define and configure a cypress-run job and push it to GitHub.
Here is the workflow file cypress.yml created for our project.
name: Cypress Tests
on: [push]
jobs:
  cypress-run:
    runs-on: ubuntu-latest
    strategy:
      fail-fast: false
      matrix:
        containers: [1]
    name: Cypress Run
    steps:
      - name: Setup Node
        uses: actions/setup-node@v3
      - run: node -v
      - name: Checkout
        uses: actions/checkout@v3
      - run: sqlite3 web-frameworks.db ".read frameworks.sql"
      - name: Cypress run
        uses: cypress-io/github-action@v5
        with:
          start: npm run tests:dev
          wait-on: 'http://localhost:3000'
          command: npm run cypress:run
In our Cypress Tests workflow above, we have a job named cypress-run that gets executed on every push event on the repository that runs 3 actions, with the first and second actions setting up and logging out the Node.js version respectively, the third action checks out our repo code so that it can be accessed by the workflow. The fourth is a command creating a SQLite file db at the root of our project and then restoring the data that we dumped earlier from Turso, and the last action running the Cypress tests.
To read more on GItHub Actions, click here.
Make sure that you stage the package-lock.json file for the GitHub Action workflow to know the project dependencies versions. We also need to stage the SQLite data dump file frameworks.sql we created in the previous step.
On completion, push the changes to GitHub.
To see your tests, you need to open the Actions tab on your GitHub repository, on initial access you'll be required to grant GitHub Actions some permissions. Afterwards you should be able to see the results of the actions ran as seen in the following screenshot:
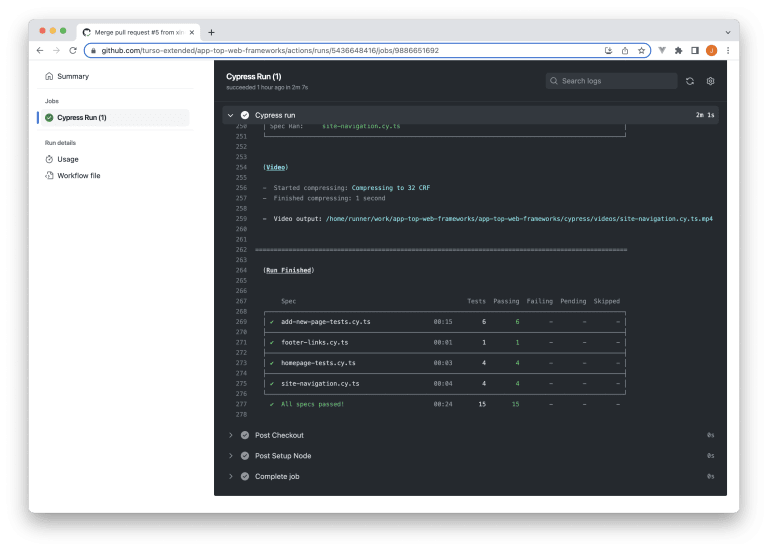
If the GitHub Actions log is not as informative and you would like to have more information regarding your tests, Cypress offers a cloud service — “Cypress Cloud” that lets you monitor test failures in realtime and other important stats and info about them. You can read more about that by clicking here.
We have completed our blog's topic by demonstrating how we can use Turso's libSQL driver to provide the application state for apps during Cypress' E2E tests. To learn more and interact with the communities involved in the stack used in the blog, visit the following links:
If you liked this article and would like to get updates on more content of the ilk, you can follow me on twitter at @xinnks.