Save Resend email events to your Turso Database
Learn how to persist Resend emails to your database for compliance and analytics.

Resend is the email API for developers. It's a fantastic service that boasts an incredible developer experience, and email delivery reliability. If you're building a platform that needs to send transactional or marketing emails at scale, Resend is a great choice.
Like many email services, Resend provides webhooks to notify you of events that happen with the emails you send.
We can use those events to store data in a database, which can be useful for a variety of reasons, including debugging, compliance, and analytics.
Resend has the following event types:
email.sentemail.deliveredemail.delivery_delayedemail.complainedemail.bouncedemail.openedemail.clicked
An example payload looks something like this:
{
  "type": "email.sent",
  "created_at": "2023-02-22T23:41:12.126Z",
  "data": {
    "created_at": "2023-02-22T23:41:11.894719+00:00",
    "email_id": "56761188-7520-42d8-8898-ff6fc54ce618",
    "from": "Acme <onboarding@resend.dev>",
    "to": ["delivered@resend.dev"],
    "subject": "Sending this example"
  }
}
For the purposes of this tutorial, we'll create two tables — events and clicks. We'll use these to store the webhook events and clicks respectively.
#Prerequisites
- A Turso account
- A Resend account
- Node.js and NPM installed on your machine
- A basic understanding of JavaScript and Node.js
#1. Setup a Database
Begin by creating a Database with Turso. You can use the Turso CLI, Dashboard, or sqlite.new to create a new database with one click.
If you'd prefer to follow along using the CLI, you can create a new database with the following command:
turso db create resend-webhook-events
Then connect to the database shell:
turso db shell resend-webhook-events
Now create two tables we need to store the Resend webhook events:
CREATE TABLE events (
    id TEXT PRIMARY KEY,
    type TEXT NOT NULL,
    created_at TEXT NOT NULL,
    email_created_at TEXT NOT NULL,
    email_id TEXT NOT NULL,
    email_from TEXT NOT NULL,
    email_to TEXT NOT NULL,
    email_subject TEXT NOT NULL
);

CREATE TABLE clicks (
    id TEXT PRIMARY KEY,
    event_id INTEGER NOT NULL,
    ip_address TEXT NOT NULL,
    link TEXT NOT NULL,
    timestamp TEXT NOT NULL,
    user_agent TEXT NOT NULL,
    FOREIGN KEY (event_id) REFERENCES events(id)
);
Now we have a database and tables to store our events, it's now time to create a webhook handler to receive and store the events.
#2. Create a webhook handler
You can use any language or framework to create a webhook handler. For this tutorial, we'll use the Hono framework with Node.js since it's easy to get started with.
If you're adding this to an existing project, you can skip configuring Hono, but you should implement the handler logic.
npm create hono@latest
Give your project a name, and select a template — this tutorial will use nodejs.
You should now see something inside src/index.ts that looks like this:
import { serve } from '@hono/node-server';
import { Hono } from 'hono';

const app = new Hono();

app.get('/', (c) => {
  return c.text('Hello World!');
});

const port = 3000;
console.log(`Server is running on port ${port}`);

serve({
  fetch: app.fetch,
  port,
});
#3. Install Turso's Node.js client
npm install @libsql/client
Next, fetch your database URL and auth token from the Turso CLI:
turso db show resend-webhook-events --url
turso db tokens create resend-webhook-events
Now inside src/index.ts, import the @libsql/client and create a new client:
import { createClient } from '@libsql/client';

const db = createClient({
  url: '...',
  authToken: '..',
});
You should use environment variables for the url and authToken. Depending on the framework, platform, and runtime, sourcing these environment variables may differ.
#4. Implement the webhook handler
We're now ready to start processing the events from Resend. We'll configure the actual webhook in the next step, but for now, let's implement the handler.
Inside src/index.ts we can add a new route to handle the webhook events. We'll call this /webhooks for now:
app.post('/webhooks', async (c) => {
  const { type, created_at, data } = await c.req.json();

  if (!type || !created_at || !data) {
    return c.json({ error: 'Invalid payload' }, 400);
  }

  try {
    // Do something with the event...

    return c.json({ message: 'Webhook received' });
  } catch (err) {
    return c.json({ message: 'Could not process webhook.' }, 500);
  }
});
You'll notice above we destructure type, created_at, and data from the request body, we'll store these in the database. If the payload is invalid, we'll return a 400 response.
const { email_id, from, to, subject, created_at: emailCreatedAt, click } = data;
const eventId = uuidv4();

await db.execute({
  sql: `INSERT INTO events (id, type, created_at, email_created_at, email_id, email_from, email_to, email_subject)
        VALUES (?, ?, ?, ?, ?, ?, ?, ?)`,
  args: [
    eventId,
    type,
    created_at,
    emailCreatedAt,
    email_id,
    from,
    to,
    subject,
  ],
});
You'll notice we're using uuidv4 to generate a unique ID for the events. Make sure to install that:
npm install uuid
npm install -D @types/uuid
Then import it at the top of the file:
import { v4 as uuidv4 } from 'uuid';
Next let's check if the event type was email.clicked and if so, insert the click data into the clicks table:
if (type === 'email.clicked' && click) {
  await db.execute({
    sql: `
        INSERT INTO clicks (id, event_id, ip_address, link, timestamp, user_agent)
        VALUES (?, ?, ?, ?, ?, ?)
      `,
    args: [
      uuidv4(),
      eventId,
      click.ipAddress,
      click.link,
      click.timestamp,
      click.userAgent,
    ],
  });
}
We're almost done!
Most of the glue code is in place, parsing the webhook payload, and forwarding it onto the database. However, if you notice the example payload from earlier, the to field is an array of email addresses. We need to store this as a string in the database, comma separated.
Here's a basic helper to transform emails into an array:
const emailToCsv = (emails: string[]) =>
  Array.isArray(emails) ? emails.join(',') : emails;
Now we can use this helper to store the to field in the database:
await db.execute({
  sql: `INSERT INTO events (id, type, created_at, email_created_at, email_id, email_from, email_to, email_subject)
        VALUES (?, ?, ?, ?, ?, ?, ?, ?)`,
  args: [
    eventId,
    type,
    created_at,
    emailCreatedAt,
    email_id,
    from,
    emailToCsv(to),
    subject,
  ],
});
That's it! You now have a webhook handler that can receive and store events from Resend.
#5. Configure the webhook in Resend
Now all that's left to do is deploy your application, and tell Resend where to send events.
If you're working locally, you can use the Hookdeck CLI to tunnel webhook events from the web to your local machine.
Hono is running on port 3000. If you're using a different language or framework, the port it runs on may differ. You can create a local tunnel with the Hookdeck CLI like so:
hookdeck listen 3000 resend
You should now see something like this:
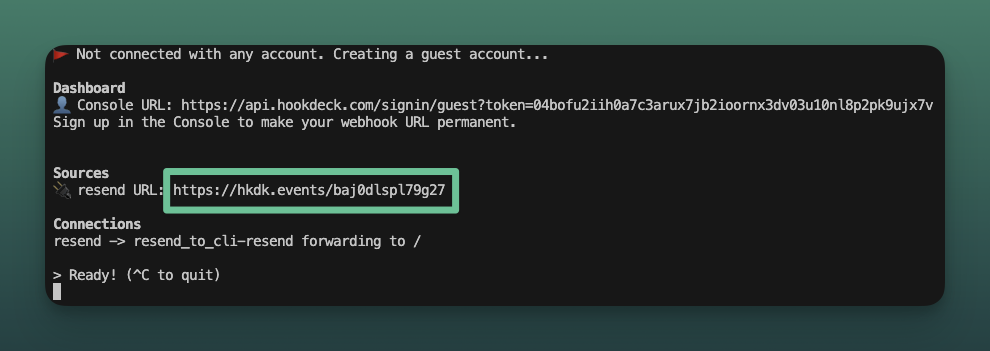
Copy the Forwarding URL.
Now go to your Resend Dashboard and Add a new Webhook. Paste the Forwarding URL from Hookdeck into the URL field with the /webhooks path:
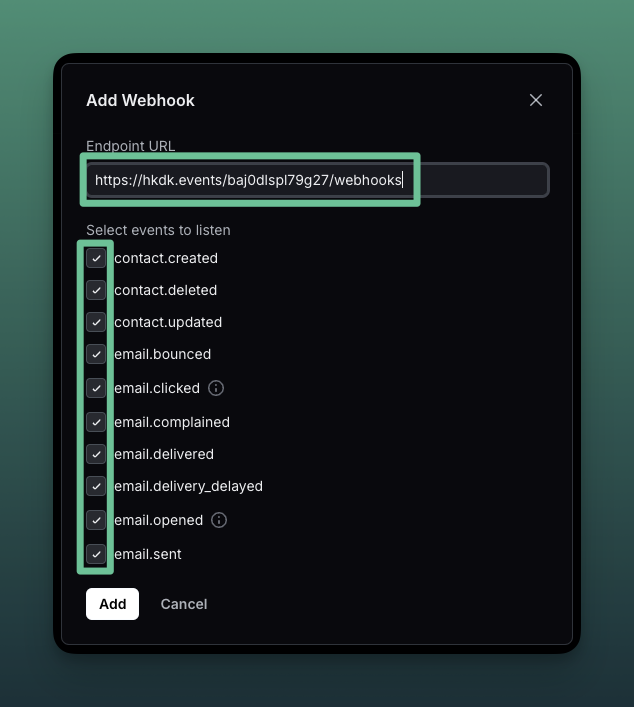
Make sure to select the events you want to track. The API we built will handle all types, so select them all.
#6. Try it out!
Now anytime the webhook is triggered, the event will be stored in your database.
Let's try out by sending an test event via curl, using the example from the Resend docs:
curl -L 'https://hkdk.events/baj0dlspl79g27/webhooks' \
-H 'Content-Type: application/json' \
--data-raw '{
  "type": "email.clicked",
  "created_at": "2023-02-22T23:41:12.126Z",
  "data": {
    "created_at": "2023-02-22T23:41:11.894719+00:00",
    "email_id": "56761188-7520-42d8-8898-ff6fc54ce618",
    "from": "Acme <onboarding@resend.dev>",
    "to": ["delivered@resend.dev"],
    "click": {
      "ipAddress": "122.115.53.11",
      "link": "https://resend.com",
      "timestamp": "2023-02-24T05:00:57.163Z",
      "userAgent": "Mozilla/5.0 (Macintosh; Intel Mac OS X 10_15_7) AppleWebKit/605.1.15 (KHTML, like Gecko) Version/16.1 Safari/605.1.15"
    },
    "subject": "Sending this example"
  }
}
'
Now let's query the database to get some stats about our stored events:
SELECT
  (SELECT COUNT(*) FROM events) as total_events,
  (SELECT COUNT(*) FROM clicks) as total_clicks,
  (SELECT COUNT(*) FROM events WHERE type = 'email.sent') as sent_count,
  (SELECT COUNT(*) FROM events WHERE type = 'email.delivered') as delivered_count,
  (SELECT COUNT(*) FROM events WHERE type = 'email.opened') as opened_count;
You should see something like this:
TOTAL EVENTS     TOTAL CLICKS     SENT COUNT     DELIVERED COUNT     OPENED COUNT
1                1                2              0                   0
You now have a copy of each event sent in your own database that you can query and analyze as needed.
#Conclusion
In this tutorial, we built a webhook handler that can receive events from Resend and store them in a database. We used @libsql/client to interact with the database and uuid to generate unique IDs for events and clicks.
Keep in mind that this is a basic example running locally using the Hookdeck CLI. In a production environment, you should consider:
- Verifying webhooks with
svix - Consider adding a queue to handle and process events in a background job
- Using Hookdeck to verify, queue, and reliably deliver all your webhooks
- Add indexes to the database for better performance
- Consider tweaking the column names to better reflect your app and user data
- Deploy it to a cloud provider like Vercel, Netlify, AWS, GCP, or Azure